Demystifying Chocolate Cake: From Novice to Layered Perfection
For too long, the idea of baking a magnificent chocolate cake from scratch has been shrouded in an aura of complexity, leading many to begrudgingly reach for a box mix. But what if we told you that creating a rich, decadent, homemade chocolate cake is not only achievable but surprisingly simple, regardless of your baking experience? It's time to ditch the excuses and embrace the joy of baking your very own masterpiece, from a straightforward one-bowl wonder to a show-stopping layered perfection.
The secret lies in selecting the right recipe and understanding a few fundamental techniques. With highly-rated, proven recipes designed for success, even those who claim to be "not much of a baker" can achieve stunning results. Imagine the aroma filling your kitchen, the pride in presenting a dessert you crafted yourself, and the sheer delight of that first bite. Let's embark on this delicious journey together, proving that anyone can bake an incredible chocolate cake.
The Magic of the One-Bowl Wonder: Simplicity Redefined
Our journey begins with the revelation that an incredibly rich and satisfying chocolate cake doesn't require an arsenal of baking tools or hours of painstaking effort. Forget the stand mixer, the multiple bowls, and the intimidation of a complex ingredient list. The beauty of a well-crafted "one-bowl" recipe is its inherent simplicity and efficiency, making it the perfect entry point for aspiring bakers.
Recipes lauded by thousands of home cooks often become favorites for a reason: they guarantee success. Picture a 5-star rated recipe, with thousands of reviews attesting to its foolproof nature. This isn't just a recipe; it's a promise of a delicious outcome. The genius of such a recipe often lies in its straightforward methodology: all ingredients can be combined in a single bowl, typically with just a wire whisk, eliminating the need for bulky electric mixers.
While the recipe might suggest mixing everything at once, a smart hack for an even smoother batter involves combining the wet ingredients separately in a large measuring cup before incorporating them into the dry. This subtle tweak helps prevent overmixing and ensures a perfectly uniform consistency. And the versatility? Incredible. A single batter can transform into a classic 9-inch round cake, a family-sized 9x13 sheet cake, two dozen delightful cupcakes, a charming Bundt cake, or even a foundation for a simple layered creation. For an in-depth look at making your first simple, yet spectacular, chocolate cake, explore our guide on Easy Chocolate Cake From Scratch: No-Fail Recipe for Anyone.
The essence of the one-bowl method is not just about convenience; it's about minimizing the steps that can lead to common baking pitfalls. Fewer transfers mean less chance of overworking the gluten in the flour, which can result in a tough cake. Instead, you're left with a tender, moist, and undeniably chocolatey crumb that will impress even the most discerning palates.
Elevating Your Bake: Crafting a Layered Masterpiece
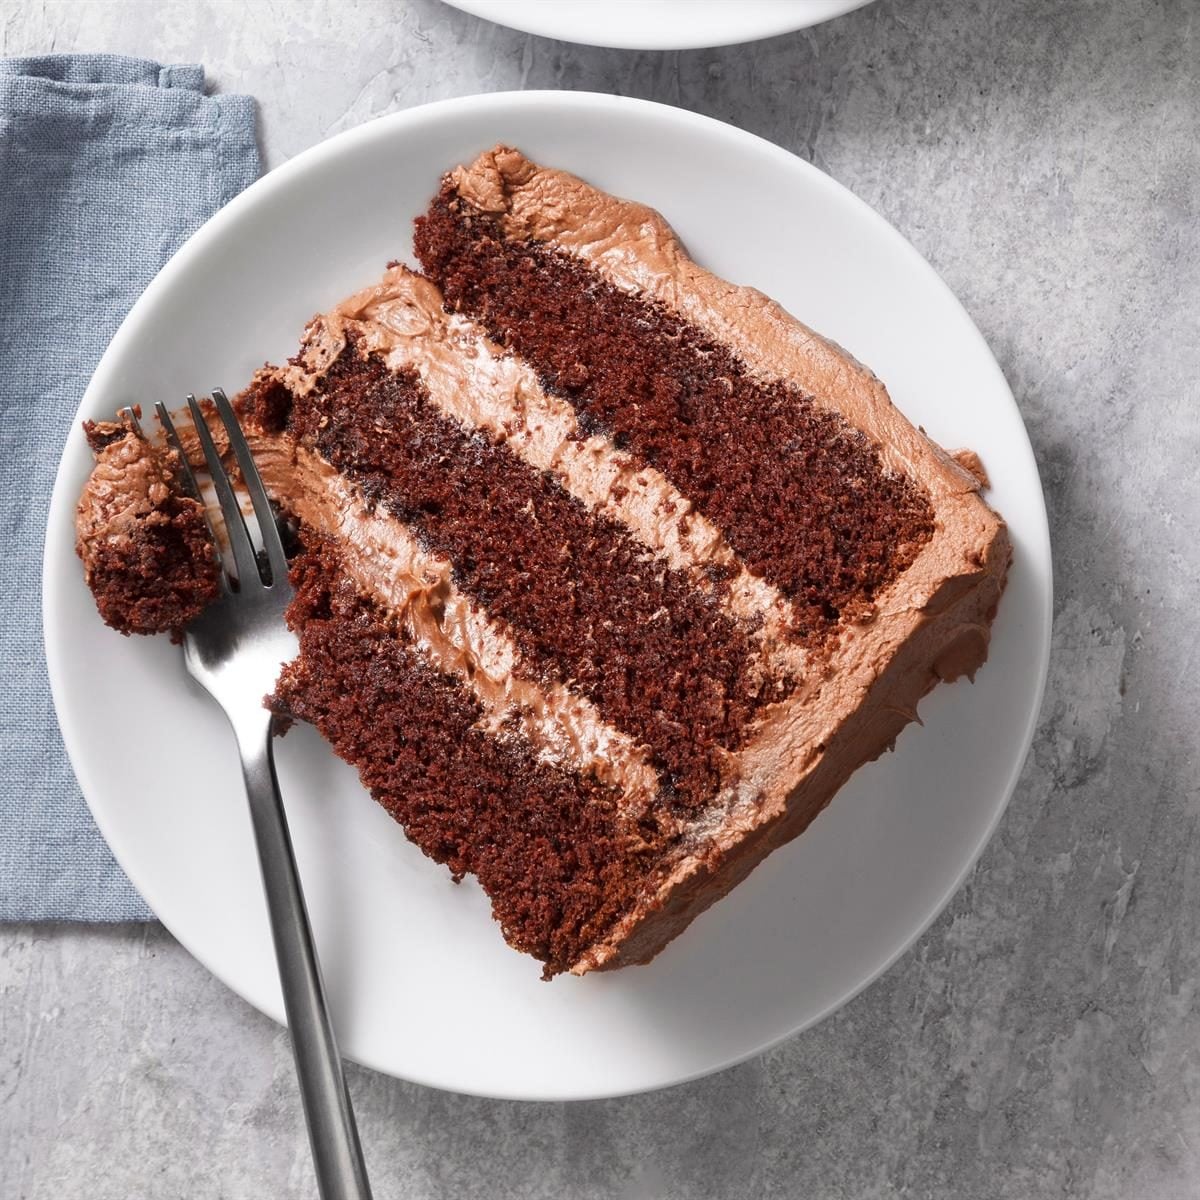
Once you've mastered the one-bowl marvel, you might find yourself craving a new challenge: the elegant, towering presence of a multi-layered chocolate cake. This isn't just about baking; it's about crafting an experience, a centerpiece that speaks volumes about your culinary dedication. The "ultimate" layered chocolate cake often features three generous tiers, each contributing to a magnificent structure and an even more profound chocolate flavor.
For truly professional-looking layers, precision is key. When dividing your batter, don't just eyeball it; grab a kitchen scale. Aiming for an equal weight of batter in each pan — around 575 grams for a typical triple-layer cake — ensures even baking and perfectly level layers, simplifying the stacking process significantly. Once the batter is in the pans, gently bang them on the counter a few times. This simple step releases any large air pockets, preventing craters or tunnels in your baked cake, leading to a denser, more uniform texture.
The most critical rule for any layered cake, bar none, is patience when it comes to cooling. Never attempt to frost or stack warm cake layers. The heat will instantly melt your beautiful frosting, turning your masterpiece into a sliding, crumbly mess. Allow your cakes to cool completely on a wire rack. For easier handling and assembly, especially with softer cake layers, consider chilling them in the refrigerator or even wrapping them tightly in plastic wrap and freezing them until solid. Frozen or chilled layers are firmer, less prone to tearing, and much simpler to stack and frost evenly. For expert strategies on achieving flawless tiers and elegant presentation, check out our dedicated guide: Ultimate Layered Chocolate Cake: Pro Frosting & Stacking Tips.
The Art of Frosting & Presentation
No chocolate cake is complete without its crowning glory: the frosting. Whether you prefer a quick, simple whip or a rich, complex ganache-like creation, the frosting is where flavor meets artistry. For beginners, a 5-ingredient "Best Chocolate Frosting" recipe is often a fantastic choice, quick to whip up and reliably delicious. If you're building a layered cake, a good rule of thumb is to double your frosting recipe to ensure ample coverage.
More ambitious frostings might lean towards a dense, fudgy texture that falls somewhere between a luxurious ganache and a spreadable hot fudge. These typically involve melting dark chocolate with butter, cream, and brown sugar. The trick here is patience: once melted and combined, this type of frosting needs to cool to a spreadable consistency. Stirring it every 15 to 20 minutes as it cools is crucial for maintaining its smoothness and preventing lumps. Don't rush this step!
Mastering the Crumb Coat and Stacking
Stacking layers requires a delicate touch. Start by securing your first cake layer to your serving platter with a dollop of frosting — this acts as an adhesive. Spread about a 1/4-inch layer of frosting evenly across the top, then carefully place the next cake layer. Repeat until all layers are stacked.
The secret to a pristine, crumb-free final frosting layer is the "crumb coat." Apply a very thin layer of frosting all over the cake — top and sides — effectively sealing in any stray crumbs. Don't worry about perfection; its purpose is purely functional. Once applied, chill the cake in the refrigerator for about 15 minutes. This allows the crumb coat to firm up. After chilling, you can apply your final, thicker layer of frosting with confidence, knowing your cake will be flawlessly smooth.
Presentation Hacks for a Polished Look
For a clean, bakery-worthy presentation, here's a genius hack: before you start frosting, tuck strips of parchment or waxed paper under the edges of your cake, all around the base. These strips will protect your platter from errant frosting drips and smudges. Once you're finished frosting and the cake looks perfect, simply slide out the paper strips to reveal a beautifully clean serving surface. It's a small detail that makes a huge difference!
And for removing sheet cakes from pans, especially if you're planning to cut them into layers: lay a sheet of parchment paper over the cooled cake, then place a cutting board over that. Invert the entire assembly swiftly and carefully. This allows the cake to release cleanly onto the cutting board, ready for slicing and frosting.
Baking Beyond the Basics: Storage and Serving
You've poured your heart (and chocolate) into creating a magnificent chocolate cake; now, ensure it remains as delicious as the moment it was baked. Proper storage is key to maintaining freshness, texture, and flavor.
- Refrigeration: For short-term storage (up to 5 days), wrap individual portions or the entire cake tightly in plastic wrap. If the cake has cut edges, cover those specifically with plastic wrap before placing it in an airtight container. This prevents the cake from drying out and absorbing other odors from the fridge.
- Freezing: For longer preservation, a chocolate cake can be frozen for several weeks. Wrap portions or layers in a double layer of plastic wrap, then an additional layer of aluminum foil, or place them in a freezer-safe airtight container. When ready to enjoy, thaw the cake overnight in the refrigerator.
- Serving: To experience your chocolate cake at its absolute best, always allow it to come to room temperature for about 15 minutes before serving. This allows the butter in the cake and frosting to soften slightly, enhancing the cake's tender texture and the frosting's creamy mouthfeel, bringing out the full depth of its chocolate flavor.
Conclusion
From the unassuming simplicity of a one-bowl marvel to the elegant grandeur of a tiered masterpiece, baking a homemade chocolate cake is an immensely rewarding experience that truly is accessible to everyone. By choosing reliable recipes, understanding a few key techniques — like proper cooling and the magic of a crumb coat — and embracing a little patience, you can confidently create a dessert that rivals any bakery. So, gather your ingredients, preheat your oven, and prepare to delight your senses. The journey from a novice baker to someone who crafts perfect chocolate cakes is not just about following a recipe; it's about discovering the joy and satisfaction that comes from creating something truly delicious from scratch.
